Shimmering Coco Dust Acrylic Nails
Shimmering Coco Dust Acrylic Nails
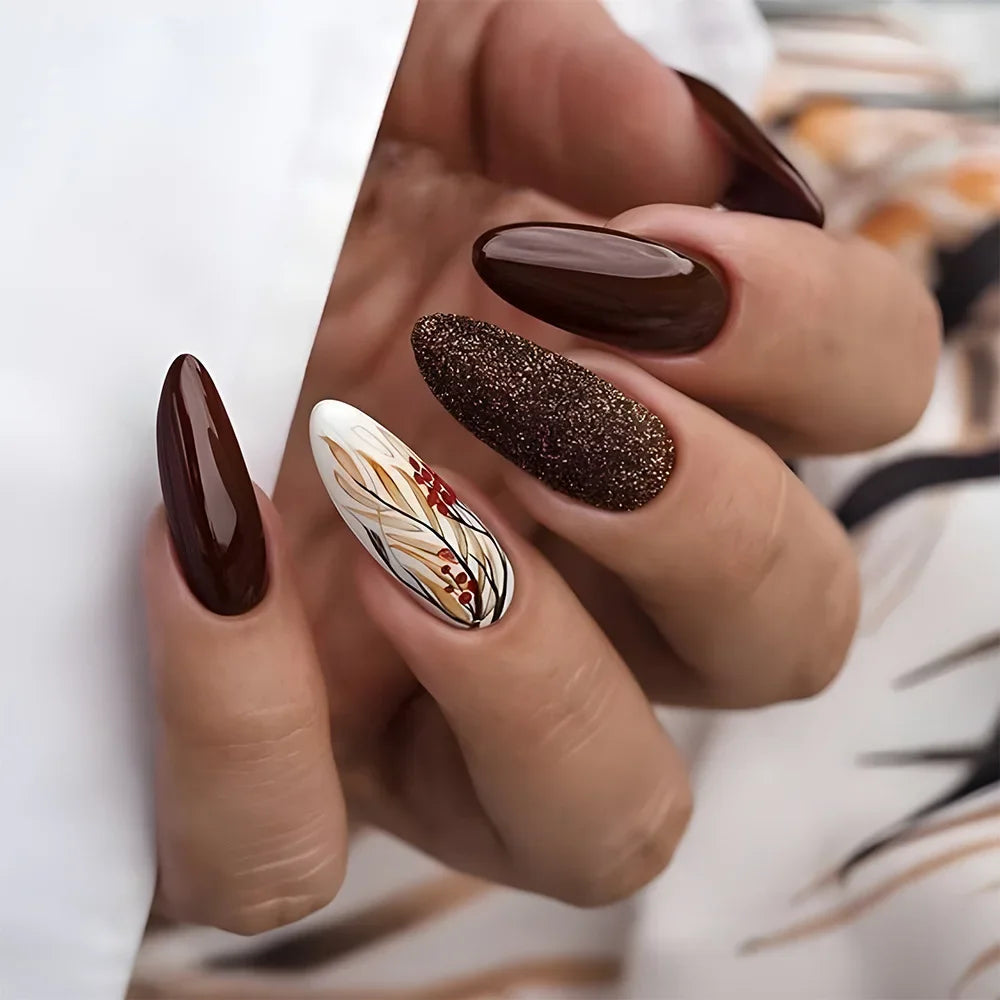
Velvet & Venom
Immerse your nails in the rich, sophisticated hues of nature with this stunning acrylic nail set. Deep espresso brown meets shimmering chocolate dust for a perfect blend of sleek and textured finishes. A single accent nail, painted in a creamy ivory, showcases delicate botanical line art with warm amber and russet tones, adding a touch of artistic refinement. Whether you're embracing autumnal vibes or simply love timeless neutrals, this set brings an effortless balance of bold and elegant.
Why You’ll Love It:
Why You’ll Love It:
Features a mix of glossy, matte, and textured finishes
Warm brown tones suit any season and outfit
Elegant botanical art adds a unique, hand-painted charm
Long-lasting acrylic for a durable and polished look
How to Use:
How to Use:
How to Apply Your Reusable Acrylic Nails with Adhesive Tabs 💅✨
These high-quality acrylic nails are designed for effortless application using special adhesive nail tabs, allowing for a damage-free, reusable experience. Follow this step-by-step guide to achieve a flawless, salon-worthy manicure in minutes!
✨ What You’ll Need:
✔️ Your set of acrylic press-on nails
✔️ Adhesive nail tabs (included or purchased separately)
✔️ Nail file & buffer
✔️ Cuticle pusher
✔️ Rubbing alcohol or nail prep wipes
✔️ Small scissors (optional, for trimming tabs)
📌 Step 1: Choose & Prepare Your Nails
- Lay out the press-on nails and match them to your natural nail sizes.
- If needed, file the edges of the press-ons for a more custom fit.
📌 Step 2: Prep Your Natural Nails
- Trim and file your natural nails for an even surface.
- Use a cuticle pusher to gently push back cuticles.
- Lightly buff your nails to remove shine—this helps the tabs stick better.
- Wipe each nail with rubbing alcohol or a nail prep wipe to remove oil and dust.
📌 Step 3: Apply the Adhesive Nail Tabs
- Select the correct-sized adhesive tab for each nail.
- Peel off the backing and press the tab firmly onto your natural nail.
- Remove the top protective layer from the adhesive tab.
📌 Step 4: Apply the Press-On Nails
- Align the press-on nail with your cuticle, then press it down starting at the base and working forward.
- Hold firmly for 10-15 seconds to ensure a secure bond.
📌 Step 5: Wear & Care
- Avoid water or excessive pressure for the first hour after application.
- These nails are designed to last up to a week with proper care.
- To maximize longevity, avoid excessive oil-based products on your nails.
📌 Step 6: Safe & Easy Removal
- Gently lift the edges of the press-on nails without force.
- If needed, apply warm soapy water around the edges to loosen the tabs.
- Slowly peel off the nails, leaving no damage to your natural nails.
- Remove leftover adhesive from the nails and tabs before storage.
📌 Step 7: Store & Reuse
- Clean and store your acrylic nails in their original packaging or a small case.
- Keep extra adhesive tabs on hand for future applications.
💖 Pro Tip:
- If a nail loosens over time, simply replace the adhesive tab and reapply!
- Store nails in a cool, dry place to maintain their shape and quality.
Now you can switch up your look anytime without damage, commitment, or salon prices! 💅✨
Verfügbarkeit für Abholungen konnte nicht geladen werden